Sql Build Manager - User Manual
Michael McKechney
(michael@mckechney.com)
www.SqlBuildManager.com
Copyright 2004-2021
Sql Build Manager is an open source project maintained by Michael McKechney on GitHub
Getting Started
- Connecting to a database
- Creating your first Sql Build Manager Project file
- Adding Scripts to your project
- Script Configuration: Setting run time rules
- Bulk Add
- Bulk Add From List
- Bulk Add From Text File
Changing SQL Server Connection
Running Your SQL Builds
- Run Time Build Settings
- Executing your build project
- Build Log Information
- Validating a Build Package
Basic Command Line Execution
Targeting Multiple Servers and Databases
Advanced Script Handling
Direct Database Object Scripting
Reporting and Adhoc Queries
Stored Procedure Testing
- Stored Procedure Testing-Setup
- Stored Procedure Testing - Execution
- Automating stored procedure testing
Additional Program Information
Database Analysis
Data Extraction and Insertion
Rebuilding Previously Committed Build Packages
Enterprise / Team Settings
- Enterprise Team Settings Configuration File
- appSettings Key Value Pair
- Script Change Settings
- Script Policy Settings
- Feature Access Settings
Starting Topics
Getting Started
Connecting to a database
Sql Build Manager requires a connection to SQL Server to start. This is because 99% of its functionality needs a live connection to work.
1. To get started, run the Sql Build Manager.exe to bring up the connection window:

The SQL Servers dropdown will scan your network for broadcasting
servers. Once it has done this it will populate the list. If you don’t
want to wait or know your server name anyway, you can just type it in.
You can also maintain a list of commonly used servers in the registered
Servers list at the bottom. To do this, right-click on the Registered
Servers icon and use the pop-up menu to guide you.
2. There are 2 authentication options, Windows Authentication or SQL Server authentication. By default, it will use Windows Authentication. To enter a SQL Server ID and password, just uncheck the box. Now that you’re ready to connect, click “Connect” (Don’t worry, you can after the application is open)
Creating your first Sql Build Manager Project file
To get started, you’ll want to create a project file to store your
scripts and the run configurations. You have two options when working
with Sql Build Manager projects:
Sql Build Manager Project File (.sbm) –> this is a single self
contained file that will hold all of your scripts and script runtime
metadata. The benefits of this type of file is that by having only one
file to manage, you maintenance and sharing of your scripts if
simplified. This is especially recommended if you need to hand off your
packages to a separate group for deployment.
Sql Build Manager Build Control File (.sbx) –> this file just contains the run time metadata for your scripts. The scripts are kept –>loose–> and are saved in the same folder as the .sbx file. This option works well when you want to track your scripts in source control as the text changes will be captured (vs. the binary format of the.sbm file). You can convert a .sbx file into a .sbm file for deployments using the Action –> Package Scripts into project file (.sbm) menu option
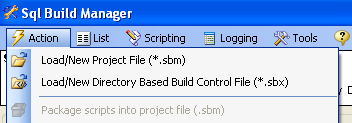
1. Use the Actions –> Load/New Project File (*.sbm) or the Action –> Load New Directory Based Build Control Files (*.sbx) menu option to open the file dialog. Navigate to the directory you want the file created and name your project. Just click the “Open” button to create the project shell.
Now you’re ready to start adding scripts to your project file. See “Adding Scripts”
Adding Scripts to your project
There are 2 basic ways to get your scripts into a project: by adding an existing file or adding the script text, but there are several methods to get access to these:
- Right-Click in the Build Scripts section and select one of the “Add New…” options
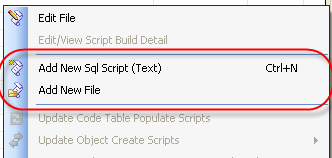
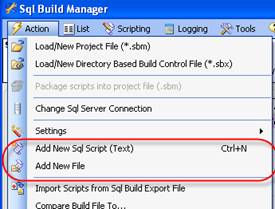
- From the Actions menu, select one of the “Add New…” options
- Perform a Bulk Add via the “List” main menu option

-
Drag and drop files from windows explorer onto the Build Scripts section
-
Drag and drop list entries from one Sql Build Manager instance into the Build Scripts section of another
Each of these methods will then prompt you to configure how you want the script to be run and against what database.
Adding an Existing File
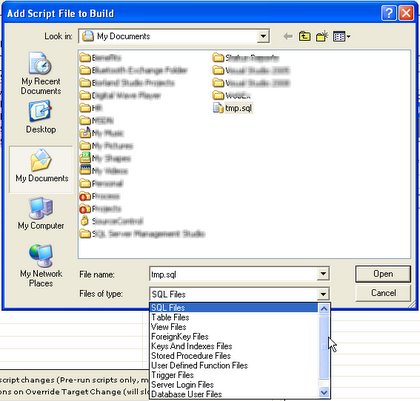
To add a pre-saved script file, you will select one of the “Add New File” menu options. This will present a dialog window for you to select the script to add. By default, it will filter for .sql files, but you can filter for any number of types, and of course an “All Files”. After you make your selection and click “Open” you will need to Configure your Script to determine how you want it to run.
Adding Script Text
To add a script that you will type or paste into your project file, you will select one of the “Add New Sql Script (Text)” menu options, or use the hot-key “Ctrl-N”. In this form, you will need to add a script name, the script itself and then Configure your Script to determine how you want it to run.
Script Configuration: Setting run time rules
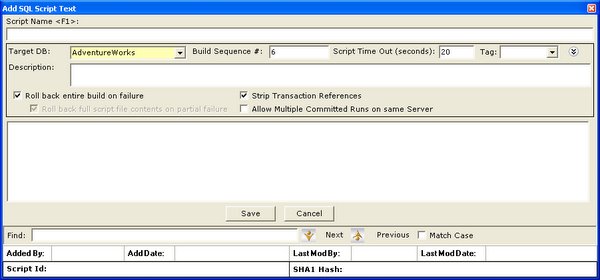
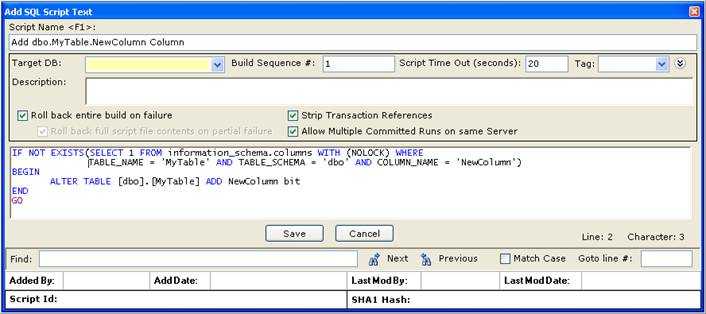
No matter how you add a new script to your project file, you will need to configure your run time rules for that script. There are 10 different attributes you can add to a script that effect it’s description and runtime.
-
Script Name - basically, what it will be called! (Only available if you add via the New Sql Script (Text) option)
-
Target DB - what database this script will be run on when the package is executed
-
Build Sequence - determines what order, in relation to the other scripts in the package, this script should be executed.
-
Script Timeout - Set the time (in seconds) of how long Sql Build Manager should allow the script to run before terminating it and considering it failed.
-
Tag - a short descriptive name used to group scripts (does not affect run order)
-
Description - an optional long description of what the script is and what it’s for.
-
Roll back entire build on failure - A key feature to the tool. This tells the tool to roll back all of the changes should this one script fail to execute properly.
-
Roll back full script file contents on partial failure - should you uncheck the above; you then have the granular option of how to handle a failure. If this script contains more than one command, you can tell the tool to roll back all of the commands or ignore the failure and keep on going.
-
Strip Transaction References - many times, scripts generated by other tools will contain transaction commands. By selecting this, you tell Sql Build Manager to take those out and be the sole handler of transactions *it is recommended that you leave this checked for table schema and data update scripts!
-
Allow Multiple Committed Runs on same server - because Sql Build Manager records a log of committed package runs, it can tell when a script has already been run on a server. It the script is constructed to allow running again (a Stored Procedure update script for instance), you can check this option to have it execute again.
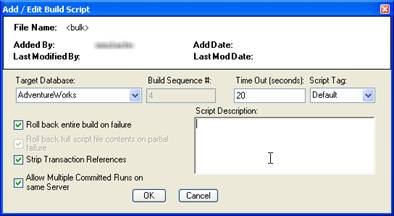
Configuration window for “Add File” and “Bulk Add” options

*Configuration window for the “New Sql Script (Text)” option and
whenever editing an existing script
**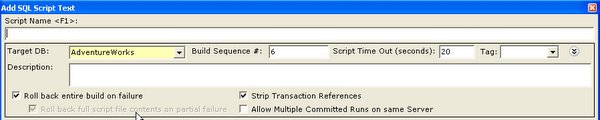
When editing an existing file, these configuration options are hidden in the new window. To display them, use the double arrow icon on the right side of the window.
Bulk Adding Scripts
There are 3 ways to bulk add scripts into your Sql Build Project file, all accessed via the List menu item:
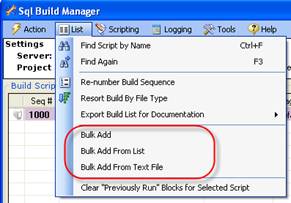
Bulk Add
This menu option opens a standard windows “File Open” dialog box. From here, you can select multiple script files to add by holding the <Shift> or <Ctrl> buttons as you click them. Clicking “OK” will then present you with the script configuration screen.
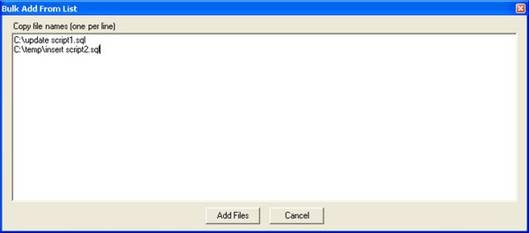
Bulk Add From List
This menu option opens a dialog box where you can type or paste in a list of files (with full paths) that you want to add to the project file. Simply add them, one per line, and click the “Add Files” button
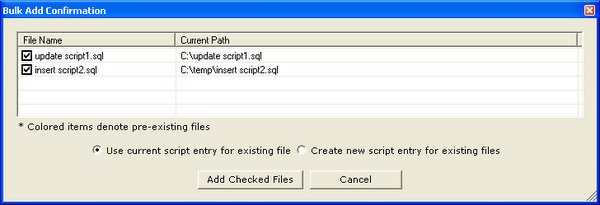
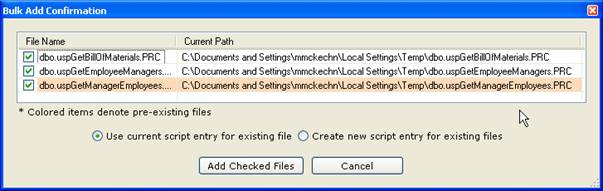
Next, you will see a confirmation screen. This step is added in case you are trying to add a script that has the same name as a script already in the project file. If you do, that item will be shaded and with the radio button options, you can choose to add a new entry or re-use the existing one (in either case, the script that is already there will be overwritten). You can also choose to “Cancel”, or uncheck those files if you have added them in error. If you click “Add Checked Files” you will be presented with the script configuration screen
 ]
]
Bulk Add From Text File
Very similar to the Bulk Add From List option. Instead of typing or pasting in a list of files in the screen, this option will pull the list from a text file for you. Just format the file with one file name per line. You will get the same confirmation screen as above with the same options, and then be presented with the script configuration screen
Changing SQL Server Connection
When you started the application, you needed to connect to an instance of SQL Server. You can change your active connection after the tool has started as well. There are 2 ways to accomplish this:
Change SQL Server Menu Option
The first is from the Action menu ‘Change Sql Server Connection” menu option. This will display the same connection window you saw when the application started. It will again enumerate the SQL Servers that are broadcasting on your network, but you can also type in the server name if you’d prefer or if your server isn’t broadcasting or select from you registered servers list.

Recent Servers list
Another option is the “quick change” selection in the “Recent Servers” dropdown. This list is populated with the last 10 servers that you have connected to and by simply changing your current selection; you will change the target server. In both this case and the Action menu option, the new server name will display in the header section.

Running Your SQL Builds
Run Time Build Settings
At run time, there are several settings you can use to change how the build file is executed against the server.
Build Type
There are essential 3 different ways to run the project against the
server: Trial, Full/Commit and Partial
Trial
In trial mode, the build project will be executed, but when
complete, it will roll back the entire project. This allows you to
test against a server in advance to make sure that all of your scripts
will execute properly. The settings that will run a trial
are: Trial and Trial - Partial.
Full/Commit
This is the setting to use when you want the package to commit its
changes to the server upon successful completion. (Of course, if any
script fails, the tool will automatically roll back the changes - after
all, that is the point of the tool :-). The settings that will perform
the commit are: Development Integration, Quality Assurance, User
Acceptance, Staging, Production, Partial and Other. The only difference
is actually just the label that gets applied to the log that you can use
as per your processed.
Partial
This setting, generally the least commonly used, works in conjunction
with the “Partial Run Start Index” text box. This allows you to specify
a starting mid-point,but run index, of the scripts to run. The settings
for this are: Trial - Partial (will roll back upon completion) and
Partial (will commit upon completion)
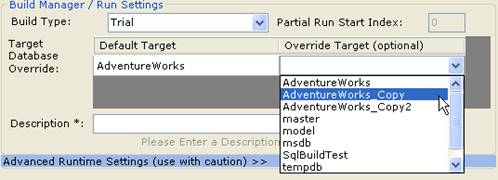
Target Database Override
There may be times during your development cycle, where you will want
to temporarily change the target database for a script (for instance if
your development environment has various versions of the database with
different names (AdventureWorks vs AdventureWorks _Copy for instance).
This drop down, when set, will use the override value for the build
execution. Whenever the tool encounters a script that is configured for
a default target that has an override set, it will use the override
instead.
Description
Before you start a build execution, you will need to enter a
description. This is used as a brief explanation of why you are updating
the database and is kept in the log. Once some text is entered, build
link becomes active, as “Start Build on “(server name”)
Executing your build project
Now that you’ve added your scripts, configured them how do you actually execute your scripts? You’re only a few quick steps away…
Executing the full project
Confirming target SQL Server
Before you kick off your scripts, check to make sure you’re running them where you want. You can verify the server you’re currently connected to via the header section; both next to the Server label as well as in the Recent Servers dropdown box (this drop down is a quick way to switch your connection-to another server)

Set Run Parameters
Set your run parameters accordingly (see here for full details), including the build type, the target database overrides (if applicable) and a build description (this becomes part of the log). Once these are set, the disabled “Please Enter a Description” link will change to “Start Build {Server Name}” and become active. Click this and your off and running!
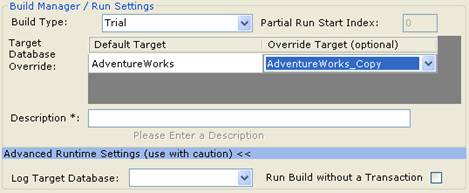
Advanced Runtime Settings: Log Target Database and Run Build without a Transaction
By default the Advanced Runtime Settings section is hidden. This is because generally, you don–>t want o use them. However, if you need to, they are there.
Log Target Database:–>By default, Sql Build Manager logs the execution to a SqlBuild_Logging table in the target database. However, if you need it to log to a different database for some reason, use this drop down selector to pick that database (note: it needs to on the same server instance). This does limit the tool–>s ability to determine the script–>s run status.
Run Build without a Transaction:One of the key features of Sql Build Manager is that it runs the build in a single transaction and if there is any failure all of the scripts are rolled-back, leaving the database in a pristine state. You can turn off this protection with this checkbox. User beware however, because now you–>re just running scripts individually and if there is a failure, all scripts that run before it are still committed.
Running / Seeing the progress
Once you click the link to start the build, several things happen:
- The current status in the bottom status panel changes to “Proceeding with Build”
- The Build Results list is populated as the scripts are run, verifying the run order, the target database it was executed against and its status.
- A “Cancel” button becomes visible. Clicking this will, of course, cancel the build execution and roll back any changes made
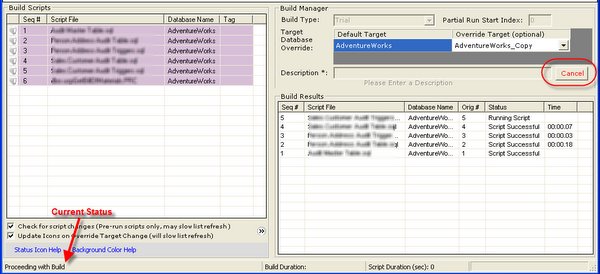
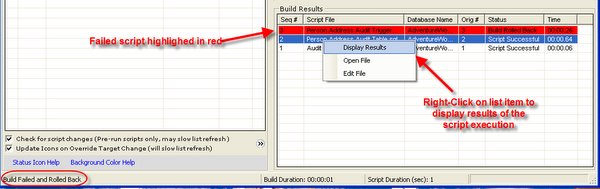
Once the build completes, either successfully or with an error, the final status of the build is shown in the status panel. The example below shows a script failure, which highlights in red and the status as “Build Failed and Rolled Back”. To determine the failure, or see the results of any script that ran, you can right-click on that item in the Build Results list and select “Display Results”. The pop-up window will display the SQL Server message and any errors.
Executing select scripts
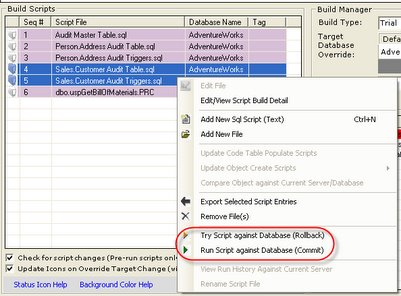
If you don’t want or need to execute the full build project from start to finish, you don’t have to. From the build scripts list, you can select one or more scripts and Right-Click to display the menu. Two options are “Try Script against Database (Rollback)” and “Run Script against Database (Commit)”. These do exactly what you’d expect them to do. Note that they will use any Override Target setting you may have set in the “Build Manager” section.
Just like a full build, you will get the status update in the “Build Results” section and the final status in the status bar.
Build Log Information
Sql Build Manager keeps both an internal (resident in the project file) and external (resident in a logging table on the target database) logs of build runs. Their contents and uses differ significantly. .
Build History
The internal logging is called “Build History”. This records the information about a build run:
- Start and end time
- Server run against
- Description entered by the user
- Build type
- Final status (committed, rolled back)
- User id of the person that executed the run
In addition, it captures details about each script that was run. The three most useful data points collected are:
- Results - the text response from SQL Server from the execution of the script. This is especially useful when there is an error in the script to help you pin-point it. To view the results in a bigger window, select the script line and right-click to
- Success - an indicator as to whether or not the script ran successfully
- File Hash - a SHA1 hash of the script run. This can be used to detect file changes.
Saving build history to external file.
If you need to save off the build history for a build or a series of builds, you can do that too. While you are in the build history window above, simply select one or more rows and right-click. Then simply select the menu option “Save Build Details for Selected Rows”. You will be presented with a Save File dialog so you can save off the detail. This detail is saved in an XML format so you can read it and also easily parse it if you need to.
Note: unlike the “Archive Build History” menu option on the main screen’s “Logging” menu, this option does not remove the build history that is stored in the Sql Build Manager project file - instead it saves off a copy.
Database Logging
Sql Build Manager logs all committed transactions to a table in the target database called SqlBuild_Logging. This allows the application to set the appropriate indicator icon in the script list and also allows the application to be able to reconstruct a build project file from database records (via the Tools –> Rebuild Previously Committed Build File menu option). This log is much more detailed that the build history and includes:
- Script Name
- Script ID (unique identifier for the script)
- Script File Hash - a means to detect changes between runs
- Commit Date
- Script Text - allows for rebuilding of the script if needed
- Plus more…
Build File SQL Logging
A final option for logging is the creation of a SQL log - a file that contains all of the scripts included in a build, in the order that they were run (including use statements for their target database) as well as comments noting the source of the script. This log is formatted such that it is a fully executable SQL script and can be run independently from any SQL query window.
By default, this is turned off, but it can be set via the “Action –>Setting –> Create SQL log of Build Runs”. These logs can be retrieved via “s” menu.
Caution! Having this set all the time can cause your build file to bloat quickly and unfortunately can slow the general processing of the file. However, it can be useful is used judiciously.
Validating a Build Package
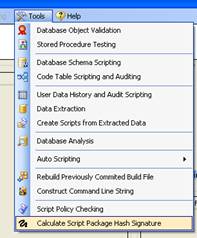
Often, you will need to turn-over your build package to another group for implementation. In doing so, you want to make sure that the package you turned over doesn’t get changed or mixed up with another one. Since the SBM file changes after each execution (the history is saved), the file hash of the SBM file is an unreliable signature. To solve this problem, you can use a hash calculated off the scripts themselves. You do this by loading up your build package, then selecting Tools –> Calculate Script Package Hash Signature menu option.
This will open up the Hash Signature window with the calculated SHA1 hash of all the script files together. You can use the Copy button to grab the hash value for publishing. The hash value will not change unless there is a change (no matter how minor) to the scripts.
 –>
–>

Basic Command Line Execution
Command Line Arguments
Sql Build Manager can be run directly via command line or through the
sbm application. The advantage of using
the “console” application is that you will be able to record exit code
values as well as stream the standard output and error text into any
automation or scheduling software that you may be using.
The command line also has the ability to run on Linux and/or run massively parallel updates leveraging Azure Batch
For command line details go here
Command Line Examples
Run standard unattended Sql build
Runs the specified .sbm build file on the designated server using the parameters and target databases defined in the project. The command line execution uses Windows authentication of the executing process to connect to the server and database(s). As with in interactive execution, the results are saved in the .sbm file for review.
sbm build --packagename "ProjectUpdate.sbm" --server ProdServer
Run an unattended Sql build with manual database override
settings
Runs the specified .sbm build file on the designated server using the
override database settings defined in the command line arguments. This
is the same as using the Target Database Override setting in the UI.
The command line execution uses Windows authentication of the executing
process to connect to the server and database(s). As with in interactive
execution, the results are saved in the .sbm file for review.
sbm build --packagename "ProjectUpdate.sbm" --server ProdServer --override "Main,Copy1"
Note that multiple overrides may be set if the build file contains more than one default database setting via a semi-colon delimited list:/override:Main,Copy1;Template,Template2>
Run an unattended Sql build with saved Multi Db configuration
Runs the specified .sbm build file using a pre-configured multiple
server/database configuration. The command line execution uses Windows
authentication of the executing process to connect to the server and
database(s). As with in interactive execution, the results are saved in
the .sbm file for review.
sbm build --packagename "ProjectUpdate.sbm" --override "prod release.multiDb"
Targeting Multiple Servers and Databases
NOTE: For more advanced multiple target database deployment, also see Remote Service Execution and Deployment
Configuring Multiple Database Targets
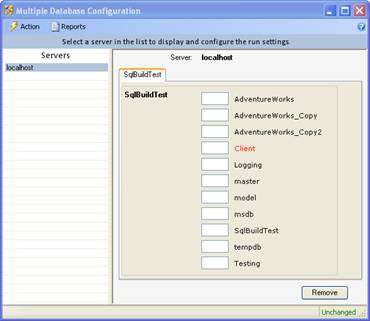
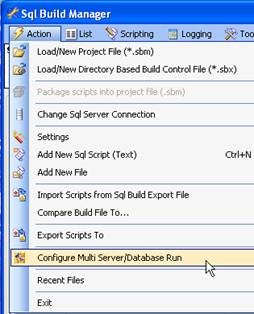
To execute commands across multiple databases at once, you will need to configure which databases you want to target. There are multiple ways to configure these targets and the default sequence of execution. For each however, you open up the –>Multiple Database Run Configuration–> window via the Sql Build Manager window, Action –> Configure Multi Server/Database Run menu option

The default window opened when opening the Multiple Database Run Configuration window will have a single main tab for the server that your main window is connected to. It will have a sub-tab for each database that you have configured in the open Sql Build File (.sbm or .sbx) that you have open.
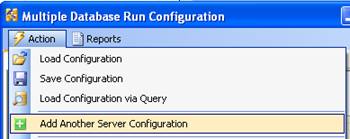
Configurations can be saved via the Action–> Save Configuration menu of the Multiple Database Run Configuration window. These are saved as .multiDb files
Pre-defined configurations can be loaded from the Action –> Load Configuration menu of the Multiple Database Run Configuration window or via the Recent Files menu if available.
Manual Sequence Assignment
1. Manual assignment consists of typing in the sequence of execution for target databases in the boxes provided. These will be the database names that are used for the override target of the sub-tab named database if you are configuring a multi-database build or will define the target databases for a report generation.
2. If you need to add additional server targets, you can use the Action –> Add Another Server Configuration menu option and use the connection window to add that server and its database list to the top level tabs. You would then configure the target database for this server also by manually typing in the sequence number.
3. To remove a server configuration that you don–>t need, make sure that its tab is selected, then click the Remove button on that configuration
Auto sequence like-named databases
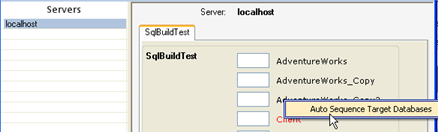
To aid in the assignment of database targets, you can auto fill the sequence textbox for databases that have similar names.
1. In the server configuration tab, right-click on a database name to display the context menu and select the Auto Sequence Target Databases option
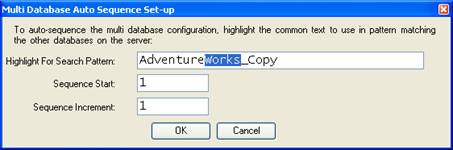
2. The auto sequence pop-up window will display. In this window, highlight the portion of the database name that is common to all those that you want to sequence. You can also set the starting sequence number and the increment for sequencing in this box. Once you have this configured, click the OK button and all of the databases that match the common pattern in their name will be sequenced accordingly.
Create Configuration via a Query
If your target database list is available via a SQL query, you can use that query to generate a multi-database configuration file at run time.
1. From the Multiple Database Run Configuration window select the Load Configuration via Query.
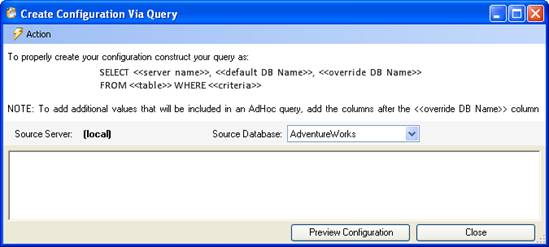
2. In this window, you can type in the query that you will use to
retrieve your database list. The query must return 3 columns worth of
data in order (the column names are unimportant):
Server Name: The server that the target database can be found on. This
is needed even if the target database is on the same server as the
default database.
Default DB Name: the default database that is configured in the
–>Database Name–> column of the Build Scripts window.
Override DB Name: This is the name of the target database that you
actually want to execute against
3. If you want to add additional data from this source that will appear in an Adhoc query, you can put in additional columns after the <<override Db Name>> entry and these values will carry over into the Adhoc query results
4. You can also load an existing query setting (.multiDbQ file) via the Action –> Open Saved Query Configuration or Recent Files menu options.
5. You can change the source database (the database this configuration query will be executed against) via the dropdown list.
6. You can change the source server (the server where the source database resides) via the Action –> Change Sql Server Connection menu option.
7. Click –>Create Configuration–> button to generate the configuration file. You will then be prompted to save the query as a .multiDbQ file (optional). The query window will close and the newly generated configuration setting will be loaded in the Multiple Database Run Configuration window.
Threaded Multi-Server Database Execution
Do you need a fast, multi-threaded execution of your scripts across a large number of databases? The threaded option is right for you. With a few command line settings, you can set up your Sql Build Manager project to get executed across hundreds, even thousands of databases in a parallel threaded fashion.
NOTE: While this type of execution still manages transactions per each SBM file execution, it does not manage all of the transactions together like when run in a serial mode. If the scripts run on one database are successful, they will be committed, even though the scripts for another database may fail and be rolled back.
Set-up
There are two options for configuring your multi-database execution. If you know all of you target databases ahead of time and want to set them up manually, you can go through the UI to create the configuration. If you need another tool to create the list or want to construct a configuration manually, you can use a simplified, delimited version of the configuration, one setting per line:
<server>:<default database>,<target database;<default2>,<override2>
- The first argument is the server name, followed by a colon (:).
- Next it the first default database, override database configuration setting, using a comma (,) as the delimiter. (Remember, the default database is the database set in the SBM for the script. The override database is the actual database you want to execute against at run time.
- If you have additional default databases set in the SBM file, you will need another override setting. Separate these pairs by a semi-colon (;).
For each database you want to execute against, add an additional line in the configuration file (i.e. each line equates to an additional thread). Finally, save the file with a .cfg extension
Advanced Script Handling
Utility Scripts
To assist you in creating robust, re-runable scripts, Sql Build Manager comes with an array of –>utility scripts–> that will allow you to insert commonly used, customized script snippets into your script file. For instance, let–>s say you need to write a script to add to a column to a table. What is the best way to write that script? Sql Build Manager knows!
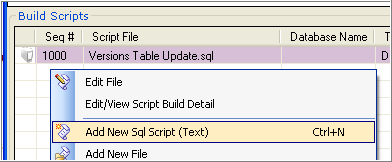
Utility Script Example
1. Right click on the Build Script list and select –>Add New Sql Script (Text)–> menu item (you can also use the Ctrl+N hot key)
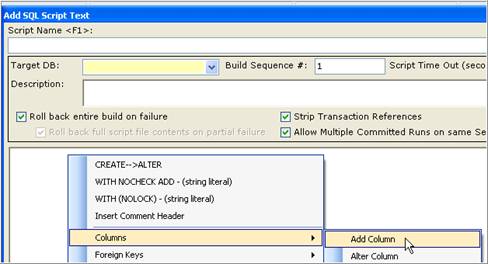
2. The –>Add Sql Script Text–> window will pop up. In this window, right click in the main script window to pull up the utility script context menu. Since we–>re adding a column, pick the –>Columns–> menu, then the –>Add Column–> option.
3. The Utility Script Replacements window will display. Since we picked Add Column, the fields required to define a new column. The scratch pad area is the contents of your clipboard. This can be handy if you have some snippet you want easy access to. Next, fill in the column definition for the required fields. As a short cut, you can highlight text in your scratchpad area and press the function key associated with the textbox you want to fill.
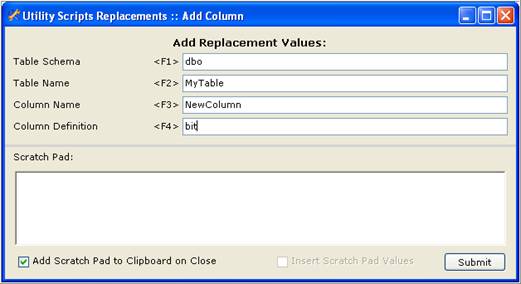
4. Once you have filled in your definition, click the Submit button. This will close the Utility Scripts Replacements window and insert the newly created script into the body of the Add SQL Script Window.–> A couple of notable features are added. First, a default name was added to the script name box. This name is dependent on the type of action you performed. Here for instance it gives you a name describing the addition of a column. Also of note the script that was created is –>wrapped–> in select against the database to see if the column already exists in the database. This allows you to commit the script multiple times without worrying about getting an error that the column already exists
Simple Text Inserts
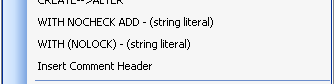
Some of the utility options don–>t do much other than insert simple, commonly used pieces of SQL.
-
WITH NOCHECK ADD –> (string literal) : this does just that, adds the text WITH NOCHECK ADD at the location of your cursor. Handy when working with Foreign Keys.
-
WITH (NOLOCK) –> (string literal) : adds the text WITH (NOLOCK) at the location of your cursor. Handy when working with scripts that have selects against tables that can afford the potential for a –>dirty read–>
-
Insert Comment Header:adds a comment header block to your script at the location of your cursor. Great for ensuring consistency in your procedure and function definitions.
- Grant Database Permissions:Adds a rather large script to iterate through your target database and grant permissions to all of your stored procedures and functions to a specified list of user groups.
Token Replacements
A canned search and replace function.
- CREATE–> ALTER:This will search all the text you have highlighted for the word CREATE (case insensitive) and replace it with ALTER.

Script Creation
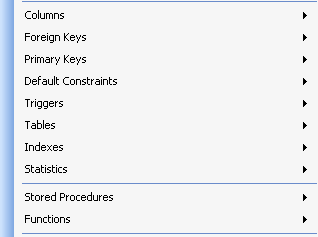
These utilities will help you create your scripts from scratch. You don–>t need to know the syntax for any of the scripts, just fill in the form and the scripts are created for you. The example above in Utility Script Example is a sample of a script creation utility. The others are found in the sub-menu for their object type. All of these scripts will contain the –>IF EXISTS–> or –>IF NOT EXISTS–> wrapping to ensure they are fully re-runable.
-
Columns
- Add Column: As above, generates a script to add a column to a table
- Alter Column: Creates a script to alter a column on a table
- Delete Column: Creates a script to delete a column from a table
- Rename Column: Creates a script to rename a column. This is a pretty complex one, very useful if you are going to rename
-
Foreign Keys
- Drop Single Foreign Key: Creates a script to drop a foreign key from a table
- Drop All Foreign Keys: Creates a script to drop all of the foreign keys associated with a table. Another pretty complex script.
-
Default Constraints
- Add Default Constraint: Creates a script to add a default value to an existing column in an existing table.
- Drop Default Constraint: Creates a script to drop a default constraint on a column. Use this when you know the name of the constraint already
- Drop Column Default Constraint: Creates a script to drop a default constraint on a column when you don–>t know the name of the constraint. This is useful when you had created a constraint without specifying a name and let SQL server name it for you with a random name.
-
Triggers
- Drop Trigger: Drops a trigger from the database
- Disable Trigger: Creates a script to disable an existing–> trigger on a database table
- Enable Trigger: Creates a script to enable an existing trigger on a database table
-
Tables
- Drop Table: Creates a script to drop a table.
-
Indexes
- Add Index: Creates a script to add a standard index (non-unique, non-clustered) to a table. Specify a comma delimited list of columns.
- Add Unique Index: Creates a script to add a unique index to a table. Specify a comma delimited list of columns.
- Add Non-Clustered Index: Creates a script to add a non-clustered index to a table. Specify a comma delimited list of columns.
- Drop Index: Creates a script to drop an existing index
-
Stored Procedures
- Drop Stored Procedure: Creates a script to drop a stored procedure from the database.
- Grant Execute to Stored Procedure: Creates a script to grant the EXECUTE permission to a specified user to stored procedure
- Revoke Execute to Stored Procedure: Creates a script to revoke the EXECUTE permission to a specified user to stored procedure
-
Functions
- Drop Function: Creates a script to drop a function from the database.
- Grant Execute to Function: Creates a script to grant the EXECUTE permission to a specified user to function
- Revoke Execute to Function: Creates a script to revoke the EXECUTE permission to a specified user to function
Script Wrappers
These are utility scripts that will take a script you already have and put it in an IF EXISTS or IF NOT EXISTS wrapper. These help you create more robust scripts that perform pre-checks around your change to limit the number of failures and roll-back changes you have as you run the scripts across your environments. Like the script creation utility scripts, these are found in the sub-menu items for the object type.
1. Add your custom script to the script form. Highlight the script (or portion of) that you want to be wrapped, then select the appropriate object wrapper selection

2. The utility window will open up. Notice that your highlighted text has been added to the scratchpad. Also notice that the checkbox –>Insert Scratch Pad Values–> is checked–> - this setting means that the text in the scratchpad will be inserted inside the–> wrapper. Fill out the form and click submit.
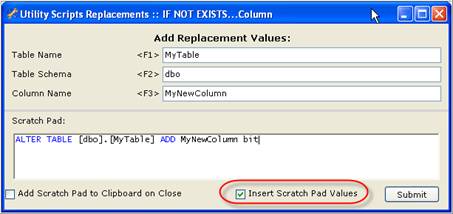
3. The utility window will close and your highlighted text with be overwritten with the–> updated –>wrapped–> script

-
Columns
-
IF NOT EXISTS–>Column: Puts a wrapper around a script to ensure that a column doesn–>t exist on a table prior to running the enclosed script.
-
IF EXISTS–>Column: Puts a wrapper around a script to ensure that a column does exist on a table prior to running the enclosed script.
-
-
Primary Keys
- Wrap Add Primary Key: Checks to make sure a primary key does not exist before running the enclosed Primary Key add script.
-
Triggers
- Wrap Add Trigger:–> Adds a script header to check if a trigger is pre-existing. If yes, then the trigger is dropped. Your create script is then added after this wrapper.
-
Tables
- Wrap Add Table: Checks to make sure the table you are adding does not pre-exist in the table. If not, it falls into your add script.
-
Indexes
-
Wrap Add Index: Checks to make sure an index on a specific table does not exist prior to running your enclosed script.
-
Wrap Alter Index:–> Checks to make sure an index on a specific table does exist prior to running your enclosed script.
-
-
Stored Procedures
- Wrap Add/Alter Stored Procedure: Adds a script header to check if the stored procedure is pre-existing. If yes, then the stored procedure is dropped. Your script is then added after this wrapper.
-
Functions
- Wrap Add/Alter Function: Adds a script header to check if the function is pre-existing. If yes, then the function is dropped. Your script is then added after this wrapper.
- IF EXISTS–>Object
- Creates a generic query against sysobjects to see if the specified object and type exist. If it does, it will run your enclosed script
- IF NOT EXISTS–>Object
- Creates a generic query against sysobjects to see if the specified object and type exist. If it does not, it will run your enclosed script
Script Manipulation and Optimization
There are several built in routines that will modify your scripts to perform specific functions.
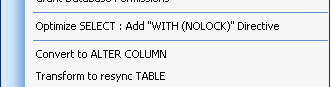
Optimize SELECT : Add –>WITH (NOLOCK)–> Directive
This routine scans through your script (just your selected section or the entire contents if nothing is selected) and will add a WITH (NOLOCK) directive to all of your table select scripts. This is a very important directive to add to your scripts (especially stored procedures and functions) to improve performance. NOTE: this should only be used when a dirty read is acceptable: reports and displays for instance, but not on important transactional selects.
Convert to ALTER COLUMN
This will take a simple CREATE TABLE script or selection of column definitions and modify it to a series of ADD/ALTER column.
1. Add your CREATE TABLE script to the script window (or just the column definition sections) and highlight it. Right-Click and select the –>Convert to ALTER COLUMN–> menu option

2. The program will run through its processing and produce the altered script containing an IF EXISTS wrapper to ALTER or ADD the defined columns.

Transform to resync TABLE
This routine will make sure that a table in all of your environments match the schema of the table you have scripted. The script created will first make sure that the specified table exists (it not, it will create it) then perform an ADD or ALTER column script for each column you have defined. Finally (and this is the part to be very aware of), it will iterate through the rest of the table schema and DROP any columns that you didn–>t have defined. This leaves you with the potential for data loss.
1. Add your CREATE TABLE script to the script window and highlight the text. Next, Right-Click and select the –>Transform to resync TABLE–> menu option.

2. You will be presented with a warning message, just to make sure you are aware of the risks and what will be created
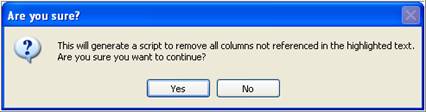
3. Clicking –>Yes–> will process the script and produce the re-sync results.

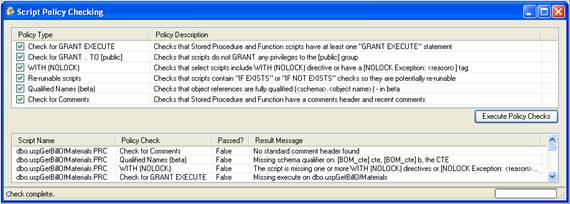
Script Policy Checking
The Sql Build Manager will perform checks against your scripts at you save them or script them from the database. These are designed to ensure that you have robust, repeatable scripts that are efficient and optimized. If a script does not pass one or more policy checks message box describing the violation will display. The user does have the ability to ignore the warning and continue on if they choose to do so.
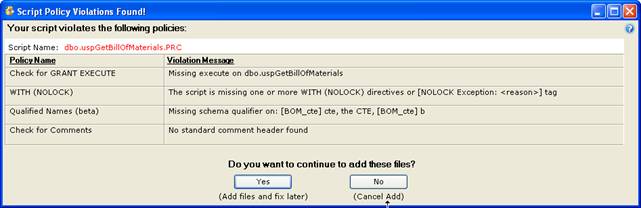
Manual Policy Checking of Build Package
In addition to policy checking when first adding or saving a script in the Sql Build Manager project, you can also run the policy checks against the entire contents of the package at once. This is accomplished via the Tools –> Script Policy Checking menu option
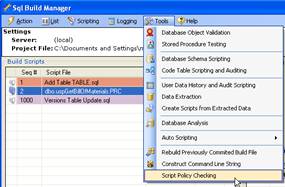
This will present you with the Script Policy Checking window. This window gives you the list of available policies and a description of each. Be default, all of the policies are checked, but you can uncheck any that you don–>t want to run this time. Next, click the –>Execute Policy Checks–> buttons and the results will appear in the bottom list. By default, failures are sorted at the top of the list. To correct violations, you can double click on the script name in this list to open an edit window.
Grant Execute Policy
This policy checks all of your stored procedures and functions to ensure that they include at least one GRANT EXECUTE ON <routine> TO <user or role> statement at the end. This is designed to ensure that proper privileges are granted to the routines so that there will not be permission problems when you deploy them.
Grant Execute to [public] Policy
Be default, SQL Server has a public role. In most cases where security is a concern, you don–>t want to use this role, but rather want to create one that has only the rights that you specify. This policy looks to see if there is a GRANT EXECUTE ON <routine> TO [public] statement in your script and warns you if there is.
WITH (NOLOCK) Policy
In order to ensure peak performance of your database and limit the number of locks and deadlock potential, most SELECT queries can be run without locks (i.e. by specifying WITH (NOLOCK) for the table). To make sure you don–>t forget to add these statements, this policy validates that each table you select against has this directive. Of course, there will be cases where you need to let the database take a lock, so to accommodate this, you can instead add a token to your scripts that provide an exception to the scripts:–> [NOLOCK Exception: <reason description>]. By adding this tag you tell the policy handler that you have purposely left out NOLOCK directives and so the policy check should not fail.
Re-runable Script Policy
A robust script is one that won–>t fail if it–>s run more than once in the same environment. In other words, it check to see if there is an unacceptable condition prior to being executed. In SQL, this is usually accomplished by adding an IF EXISTS or IF NOT EXISTS wrapper or header to your script. To aid you in doing this, the program provides methods to create these for you (see Script Creation and Script Wrappers). If also provides a policy check to make sure that there is at least one of these checks in your script. NOTE: This is not a fool-proof guarantee that your scripts are truly re-runable, but rather a quick check to see if there is a statement included.
Qualified Table Names Policy
For improved performance in SQL server, you should make sure that your objects have their schema qualifier when you reference them. <schema>.<table> This may be the standard –>dbo–> qualifier: dbo.Employee or a custom schema that you have created HumanResources.Employee. This policy checks to see that your table references all contain a schema prefix. NOTE: this is in beta as the algorithm to try to catch all instances is more complex than you–>d think. This may over-catch or under-catch for some scripts.
Comment Header Policy
For good record keeping and change auditing, it–>s great to have change comments in your routines. This policy will check to make sure you have a fairly standard comment header included in your stored procedure and function definitions. This policy specifically looks to make sure your definition contains comments for: Name, Description, Author and Change History. You can easily fulfill this policy by using the Simple Text Inserts –>Insert Comment Header–> utility script.
In addition, this policy check looks for –>recent–> comment additions to ensure that changes are being appropriate. The threshold is different depending on how the policies are run. If you are saving an individual script, creating a script through the Direct Database Object Scripting or updating generated object scripts via updating object scripts feature, the tool will look for comments created either yesterday or today. If you are running the policy checks via the Tools –> Script Policy Checking menu option, it will look for comments created within the last 40 days. The dates need to be in the mm/dd/yyyy format.
Stored Procedure Parameter Policy
This is a configurable policy that will enforce that certain parameters be included in a defined set of stored procedures. The configuration is set in the Enterprise / Team Settings configuration file. You can filter your stored procedures by Schema and Target database and define the parameter check by parameter name and parameter data type. If the policy does not find the specified parameter defined in the signature of a stored procedure that meets the filter criteria, the script will fail the check.
Direct Database Object Scripting
Scripting Database Objects
Without leaving Sql Build Manager you can create SQL object scripts directly from your designated database and add them into your Sql Build Project. You can do them one at a time, or script an entire class of database objects all at once! Here’s how…
1. Select a database to be your script source via the Scripting menu’s database drop down list:
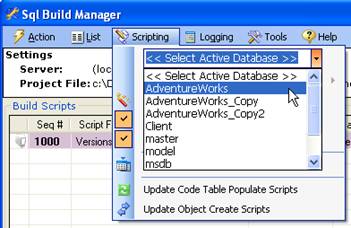
2. Once a database is selected, the next menu item list is available, where you can select the object type:
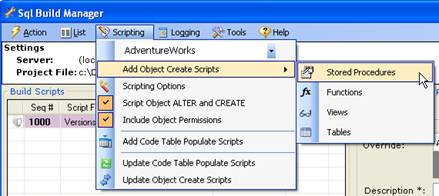
3. Now that you’ve selected your object type, Sql Build Managerpresents you with a list of all objects in the source database for you to select. You can check one or more. You can also right-click on any one of them to get a script preview of the object.
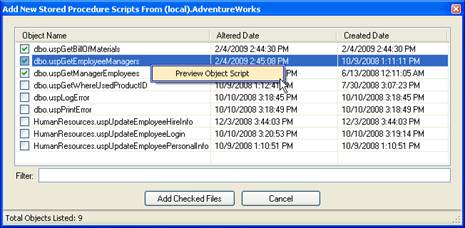
4. Once you’ve selected your objects for scripting, click the “Add Files” button and the scripts are created. As a means to confirm the selections and give you a chance to exclude duplicates, you next see a confirmation screen. Files that match (by file name) items already in your build file are colored in orange. To add the checked files into your build project, click on “Add Checked Files”.
5. Lastly, you need to tell Sql Build Manager how to handle running the files against a target database; you do this via the configuration pop-up. The same configuration will be applied to all of the scripts you’re adding in this “bulk” fashion. Check out script configuration for all of your options
Updating Scripted Objects
Once you have added a database object script to your build project, what happens if you update your database again and need to re-sync your scripts? Sql Build Manager has an answer for that as well. Because it generates scripts with both a defined extension (.PRC, .UDF, .TAB, .VIW for stored procedures, functions, tables and views respectively) and a pre-defined header section - it can also determine how to update those scripts from the source.
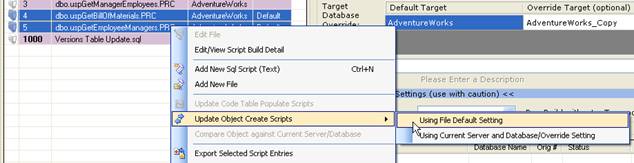
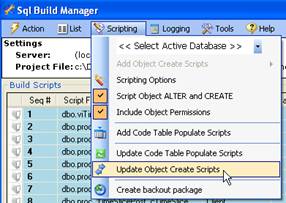
1. Start be selecting one (or more) scripts from your project list that have the extensions listed, and the “Update Object Create Scripts” context menu item will be enabled. From here, you have two choices: use the settings from the original script header or use the target database override setting (see that advanced topic).
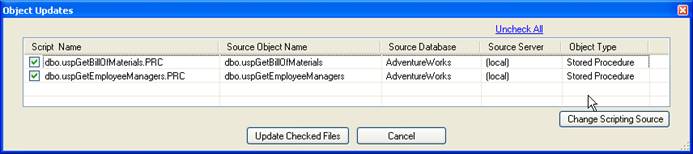
2. Once you have selected how to re-generate the scripts, you are presented with a confirmation window (similar to the one from the original scripting), then just click “Update Checked Files” update the scripts in the project file.
3. You can also update the scripts for allscriptable objects in the project file via the “Scripting –> Update Object Create Scripts” main menu option.
Creating a –>Back out Package–>
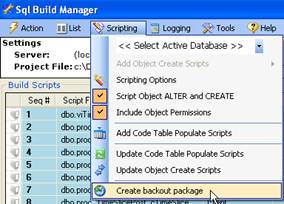
There may be an instance where after you have already committed a package to an environment that you realize something is wrong and you need to back out your changes. Since you–>ve committed and you can–>t do a rollback, you could restore from a backup copy. Alternatively, you can create a back out package that will revert your changes. Sql Build Manager can automate much of this back out creation as long as you have an unaltered version of the database somewhere (i.e. to this BEFORE you apply your changes to your production database!). To get started, click on the –>Scripting –> Create back out package–> main menu option.
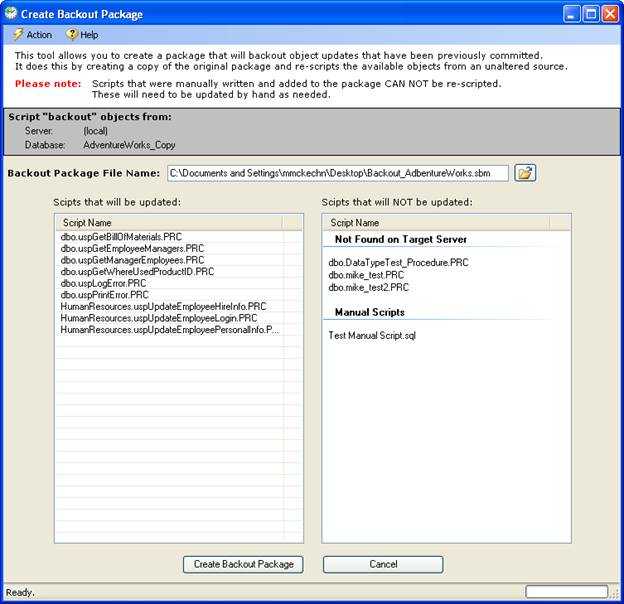
This will open update the Backout Package form. To change your database source to an unaltered version of your database, use the –>Action –> Change SQL Server Connection–> menu option, selecting both your server and database name. The selection will appear in the gray panel for reference. The two list boxes are as follows:
–>Scripts that will be updated–> –> these are scripts that the Sql Build Manager recognizes as having been scripted through the tool. Because of this, it will know how to re-script them from the new target.
–>Scripts that will NOT be updated–> –> scripts in this list fall in 1 of two categories.
-
First, is –>Not found on Target Server–> –> this means that the object in your build package hasn–>t been created on the new source. Since this is a new object, you must decide on your own what to do with it (i.e. leave it there since it–>s new and it doesn–>t really matter, or create a drop script
-
Second, is –>Manual Scripts–> –> this means that the script is something you wrote, not something the tool created for you. Because of this, you will need to determine what action needs to be taken for a back out.
Once you have set the source server and database, reviewed this lists, and set the back out file name (which will default to –>Backout_<original package name>–>, just click the –>Create Back out Package–> button. If there are any errors, the back out package will not be created and you can use the –>Help –> View Application Log File–> link to view the errors.
Reporting and Adhoc Queries
Script Status Reporting
This process will check across multiple databases to see whether or not the scripts configured in your Sql Build File (.sbm or .sbx) have been run on those databases and if they have been run, whether or not they are in sync with the build file.
- From the main Sql Build Manager window, select Action –> Configure Multi Server/Database Run

2. Configure the databases you want to generate the report against.–> (See Configuring Multiple Database Targets)
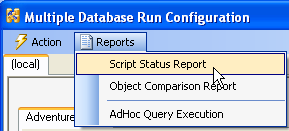
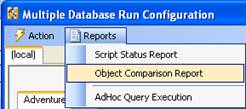
3. From the opened Multiple Database Run Configuration Page, select–> the Reports –> Script Status Report menu item
4. The Script Status Reporting window will display.
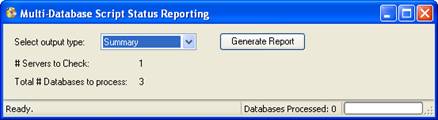
From this window, you can select the output type you would like for the report.
Summary: A pared down report that shows only scripts that are not synchronized between the build file and the target database and presents in an –>–>HTML document.
HTML: A full HTML report showing the status of all the scripts in the build file. Those that are out of sync are presented in red.
CSV: A full report showing the status of all scripts in the build file.
XML: A full report of the raw data for all the scripts in the build file.
5. To get the report, click the Generate Report button. You will be prompted to provide a file name to save the report output, and then the program will thread out the processing, collate the results and present the report in the default viewer for the specified file type.
Object Comparison Report
This report option will scan your configured database and generate hash values for all of the database objects in them. It will then create a report showing which objects are not in sync with the baseline database chosen. NOTE: running this report may be very time consuming depending on the number of objects in the databases and the number of databases configured for comparison.
- From the main Sql Build Manager window, select Action –> Configure Multi Server/Database Run
2. Configure the databases you want to generate the report against.–> (See Configuring Multiple Database Targets). The database that is configured with the lowest sequence number will be used as the baseline database.
3. From the opened Multiple Database Run Configuration Page, select –>the Reports –> Object Comparison Report menu item
4. The Object Comparison Report form will display.
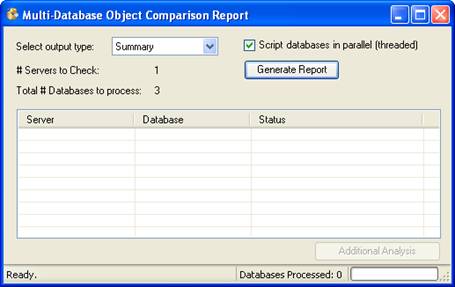
From this window, you can select the output type you would like for the report.
Summary: A pared down report that shows only the objects that are not synchronized between databases. This report will present the server, database, object type, object name and status of that object with relation to the base database.
XML: A full report of the raw data for the objects in the database
You also have the option to run the report in parallel/threaded fashion or single threaded. While the parallel option will generally be faster, it does have the potential to impact the responsiveness of your computer.
6. To get the report, click the Generate Report button. You will be prompted to provide a file name to save the report output, and then the program will begin processing. The status of the processing on each database is displayed in the table. Once complete it will collate the results and present the report in the default viewer for the specified file type.
7. After the processing is completed, the –>Additional Analysis–> button is enabled. Clicking this button will present a Comparison Analysis window where you have the ability to change the baseline database to be any database that was used in the comparison. Selecting a database and clicking Generate Report will create a new summary report and open it in your default HTML viewer. Note that this option does not re-scan the databases but rather reuses the data gleaned in the original run so there is no processing delay or performance impact.

Running Adhoc Queries against multiple targets
This option allows you to run any query you specify against multiple databases at once. These databases can be spread across multiple servers as well. A report with the collated results is presented in the format you select.
1. From the main Sql Build Manager window, select Action –> Configure Multi Server/Database Run
2. Configure the databases you want to run the Adhoc query against.–> (See Configuring Multiple Database Targets)
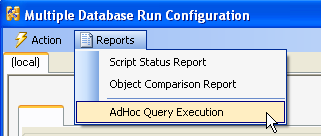
3. From the opened Multiple Database Run Configuration Page, select–> the Reports –> Adhoc Query Execution menu item
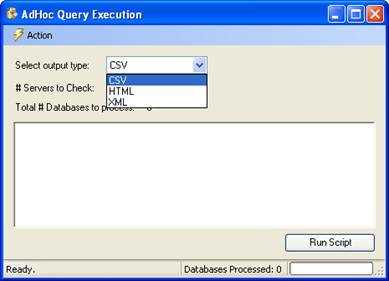
4. The query window will display. In this window, you have the option to select the output type for the report:
CSV - comma separated values
HTML - a formatted HTML report
XML - the raw data retrieved in XML format.
Also through the Action menu item, you can Open or Save a SQL query for reuse.
5. Once you have selected your output type and either typed in your query or opened an existing query from a file, click the Run Script button. You will be prompted for a location and file name to save the results then the program will then thread out the execution of the script to all of the database targets you specified in step #2, collect the data, collate it and open the output file in the default viewer for the specified file type. The columns included in the report are the server name, database name, row count and then the columns specified in the query you provided.
Stored Procedure Testing
Stored Procedure Testing-Setup
Creating your first test configuration
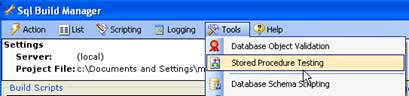
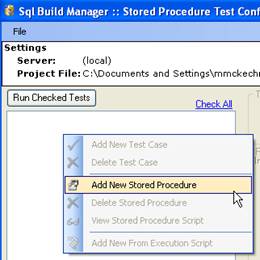
1. You access the stored procedure testing module via the main screen Tools | Stored Procedure Testing menu option
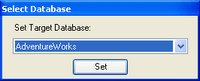
2. This will open up a new Stored Procedure Test Configuration window. To get going, you will need to create a new test configuration. Use the File –> Open/New Test Configuration menu option to open up a file dialog window. Type in your file name and click “Open”. You will now see a “Select Database” window populated with the list of databases available on your current server. A configuration can only address a single database, so if you need to test different stored procedures on another database, you will need to create another configuration. Note however, if you have two or more databases with the same stored procedures, you can use a single configuration across those databases.
3. Now that you have your database set, you can start selecting stored procedures and creating test cases.
Adding Stored Procedures
1. To add your first test case, right-click n the white area on the left (this is where your selected stored procedures and test cases will soon display) and select the only active option - Add New Stored Procedure; this will give you the Stored Procedure list:
 –>
–>
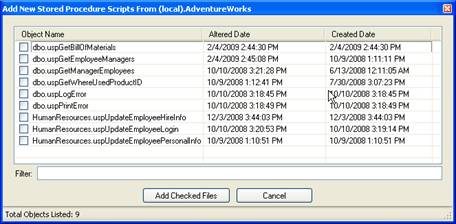
2. From this list (which shows all of the user stored procedures on the target database that have not been previously selected), check the stored procedures that you want to create test cases for (this will eventually be all of them right?) and click “Add Checked Files”.
Creating a test case
1. To create a test case, select a stored procedure from the left side list and right-click to pull up the menu. From this menu, select “Add New Test Case to <sp name>”.
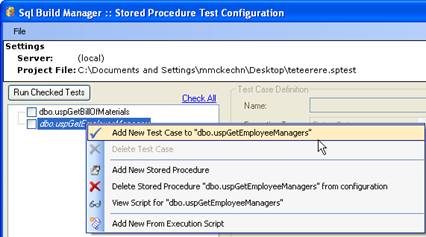
2. This will then activate the right side, test configuration section of the screen where you can set-up the test
Test Case Definition\
\
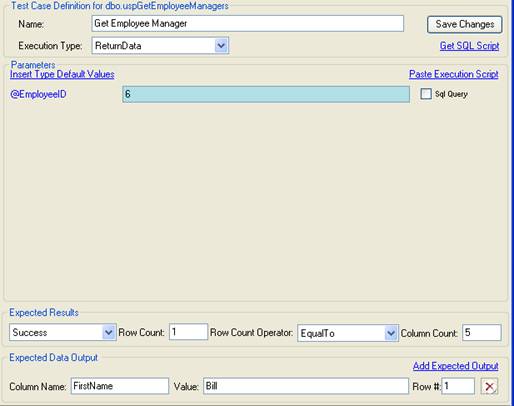
1. Name - required. Sets the descriptive name of the test. This is what will appear in the tree view on the left of the screen
2. Execution Type - required. A drop down selection of
ReturnData: expects that a result set with 1 or more columns and
possibly 0-n rows returned
NonQuery: a stored procedure that does not return data (an insert,
update or delete for example)
Scalar: expects that the result set consists of a single data point
(i.e. 1 row with 1 column)
Parameters \
\
1. Parameters - optional based on the stored procedure. These are the parameters derived from the stored procedure as it exists in the database. The type of each can be displayed by hovering over the name of the parameter.
2. Parameters with “Sql Query” set - optional. This will create
an array of unit tests, one for each result set of the query. For
example, if the employee table has 10 employees, and you paste in a SQL
statement “SELECT EmployeeID FROM Employees”, then save and execute the
test, you will run 10 tests.
NOTE: The query should only return one column of data. Also if there
are multiple parameters, this can be used in combination to create an
exponential number of tests.
Expected Results
1. Result - required. One of 4 result types must be set for the
execution of the stored procedure:
Success: The stored procedure executed properly. No exceptions were
thrown by SQL Server
GenericSqlException: If you expect that with your parameter values set,
you will get an execution exception
PKViolation: If you are forcing a Primary Key violation with your
parameter values
FKViolation: If you are forcing a Foreign Key violation with your
parameter values
2. Row Count -optional. If you want to check that the proper number of rows is returned with the stored procedure, you can set this value.
3. Row Count Operator - optional. Used in conjunction with the Row Count number. It allows you to specify that the row count be EqualTo, GreaterThan or LessThan the number specified in the Row Count.
4. Column Count - optional. If you want to check that the proper number of rows is returned, you can set this value.
Expected Data Output
You can add as many of these data checks as you’d like by clicking the “Add Expected Output” link button. For each one, there are 3 settings:
1. Column Name - required. The name of the column that you would like to perform a data value check against.
2. Value - required. The value that you expect in the designated column. NOTE: the value check is not case sensitive and does perform a trim, so extra spaces are also ignored.
3. Row # - optional. The row number of the returned data that should be checked for the value. If not specified, the first row is checked. Also, for you developers out there, this is a “1” based value so the first row returned would be Row #1 not Row #0.
Additional Features
- Get SQL Script- generates for you the SQL that will be executed bases on the current parameter value setting to allow you to cut and paste as needed.
- Insert Type Default Values - puts in a non-null value for each parameter. For numeric, it adds the default value of 0. For strings and characters is adds in an empty string. For date/time, it adds the current date and time.
- Paste Execution Script - if you use SQL server profile, you can paste in the execution script you glean from there. The tool will parse out the parameters and values and insert them into the proper place.
Stored Procedure Testing - Execution (Manual and Automated)
Once you have set up your stored procedure tests, you’ll of course want to run them, this will explain how to do that and also interpret the results you see.
Running your stored procedure tests (manual)
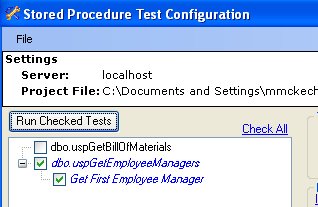
1. Execution of your tests is very straightforward. Simply check the tests you want to run (or use the “Check All” link) and click the “Run Checked Test” button. An execution/results window will open up and the tests will automatically start.
Interpreting the results
1. The tool will run through all of the tests you had checked, logging the results for each test and displaying the summary results in the execution window
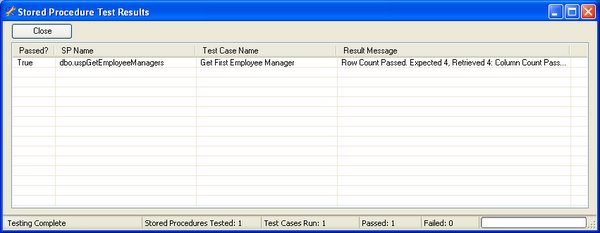
2. For each test run, you will get a result row, with an success/failure indicator, the stored procedure name, the test case name and the results summary.(Note: if there is a failure, the row will be highlighted in red). There is also a summary across the bottom, listing the number of stored procedures that were tested, the number of test cases executed, the number passed and the number failed.
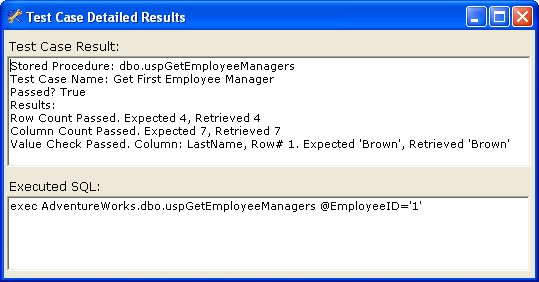
3. To view the result details of the test, you can right-click on the results row and select “Show Detailed Results”. The detail window will pop-up. In the top section you will get the same information as the summary, however the results is now fully displayed showing all of the criteria that were used in the test and the actual results retrieved. In the bottom section, the actual SQL that was executed is shown in case you need to retrieve it for another use.
Saving the results
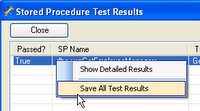
If you need to save your results for later review or for proof of testing, you can do that too. From the results summary page, you can right-click and display the menu. Select the “Save All Test Results”. The resulting file will be an XML document that contains all of the detailed information regarding the test execution that you can get via the forms above, plus the name of the target server, target database, and start and end times. Also, the test case definition is included with each result.
Automating stored procedure testing
You can easily automate your stored procedure testing by taking advantage of the console helper executable and command-line execution. Running a stored procedure test, you will need 4 command line parameters:
- /test=”.sptest config file” - informs the tool that you will be performing a stored procedure test execution using the supplied test configuration file.
-
/server=serverName - sets the target server to connect to
-
/database=target server - sets the target database to run the stored procedures on
- /log=logfilename.xml - sets the name of the XML results file you want the results sent to.
Example: SqlBuildManager.Console.exe /test=”test3.sptest” /server=myserver /database=myDb /log=”C:\logfile.xml”
Additional Program Information
Associated File Types
The application has multiple file types associated with it at install time. These files serve many purposes for different features of the application.
- .sbm :
 Single
file package that contain the scripts, script metadata and run result
history for the package.
Single
file package that contain the scripts, script metadata and run result
history for the package.
- .sbx :
 XML
configuration file. This contains the script metadata for run time
settings. The scripts are assumed to be in the same folder as the .sbx
file. This file can be packaged into a single .sbm file via the Action –>
Package Scripts into Project File (.sbm) menu option.
XML
configuration file. This contains the script metadata for run time
settings. The scripts are assumed to be in the same folder as the .sbx
file. This file can be packaged into a single .sbm file via the Action –>
Package Scripts into Project File (.sbm) menu option.
-
.sbe :
A
–>Sql Build Export–> file. The product of an export of scripts from a .sbm
file. This is essentially the same as a .sbm file, but is used to denote
scripts that are intended to be imported into another sbm file. -
.multiDb :
 **Multi-database execution
configuration file. See Configuring Multiple Database
Targets.
**Multi-database execution
configuration file. See Configuring Multiple Database
Targets.
- .multiDbQ :
 **Multi-database
configuration query file. See Create Configuration via
Query
**Multi-database
configuration query file. See Create Configuration via
Query
- .audit :
 a
auditing script creation template file. These files are used to create a
group of tables that require data auditing.–> The program can then
generate audit tables and triggers for these tables.
a
auditing script creation template file. These files are used to create a
group of tables that require data auditing.–> The program can then
generate audit tables and triggers for these tables.
- .sqlauto :
 a
configuration file for automated schema scripting. This can be used for
creating a scheduled task to generate DDL scripts for databases on a
regular basis
a
configuration file for automated schema scripting. This can be used for
creating a scheduled task to generate DDL scripts for databases on a
regular basis
- .sts :
 Sql
Table Scripting. A configuration file of –>look-up–> or –>code tables–>.
From this, the program can create script files that can be used to
replicate their contents to other environments. These scripts are
re-runable and handle both inserts and updates of values.
Sql
Table Scripting. A configuration file of –>look-up–> or –>code tables–>.
From this, the program can create script files that can be used to
replicate their contents to other environments. These scripts are
re-runable and handle both inserts and updates of values.
- .sptest :
 Stored Procedure test
configuration file. With not programming, the application can create
unit tests for stored procedures. You can supply standard or query based
input values and interrogate execution times and return values to
determine pass/fail criteria.
Stored Procedure test
configuration file. With not programming, the application can create
unit tests for stored procedures. You can supply standard or query based
input values and interrogate execution times and return values to
determine pass/fail criteria.
Database Analysis
Sql Build Manager has the built in features to run size and utilization analysis against a SQL server.
Server Analysis
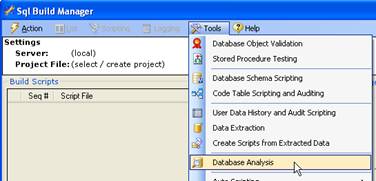
1. Upon selecting the Tools –> Database Analysis menu option, the Database Size Summary window will open. On loading, it will begin scanning the current server (as identified in both the title bar and the –>Recent Servers–> drop down box to gather the data.
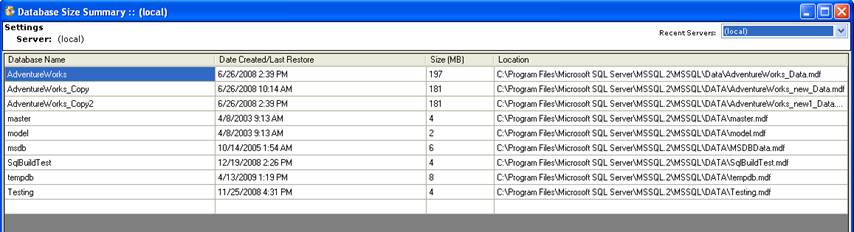
2. Once the scan is complete, you the grid will be populated with four pieces of data for each database associated with the server:
-
Database Name –> fairly obvious!
-
Date Created/Last Restore –> this is the date that the associated master database has for the creation date of the database. This date is updated whenever a database is restored from a back-up as well
-
Size (MB) –> again, fairly obvious. This is the size that SQL Server has allocated for the database MDF file.
-
Location –> The physical drive path where the MDF file is located. Note that the path is relative to the SQL Server, not your local machine.
3. You can run analysis on another server by changing the database selection in the –>Recent Servers–> drop down
Individual Database Details
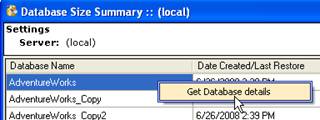
1. From the Database Size Summary form, you can gather individual database details by right-clicking on the database and selecting the Get Database Details menu item.
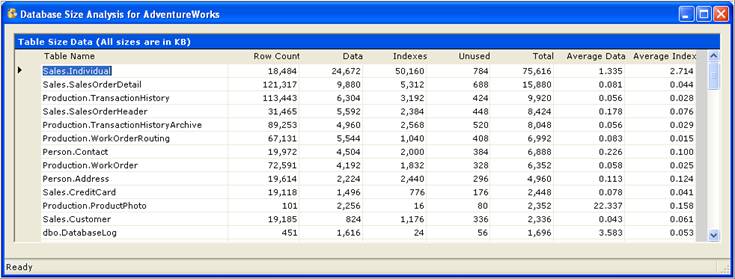
2. The size analysis for the selected database will run and load the data form. This contains data about each table in the database. (These columns are all sortable)
-
Table Name –> obvious.
-
Row Count –> the number of rows that SQL Server currently reports from its statistics (not always the same as a –>SELECT count(*)–>–> query, but generally very close
-
Data –> the size of the data stored in the table (in KB)
-
Indexes–> - the size of all of the indexes associated with the table (in KB)
-
Unused –> the amount of space that is allocated to the table but it currently empty (in KB)
-
Total –> the total amount of space that SQL Server has allocated for this table and all of its indexes
-
Average Data –> the average amount of space used per row in the table
-
Average Index –> the average amount of space used per row for all of the indexes on the table
Data Extraction and Insertion
Sql Build Manager has the ability to extract non-binary data out of a
table and store it in a formatted file. Conversely, it can take this
formatted data and create pairs if INSERT/UPDATE statements for
reinsertion and or updating of this data. It can also be used to
synchronize data between environments.
NOTE: There is a current limitation with this extract. It will not
properly handle data that contains in-line carriage returns. This will
cause a formatting error of the insert/update scripts.
Data Extraction
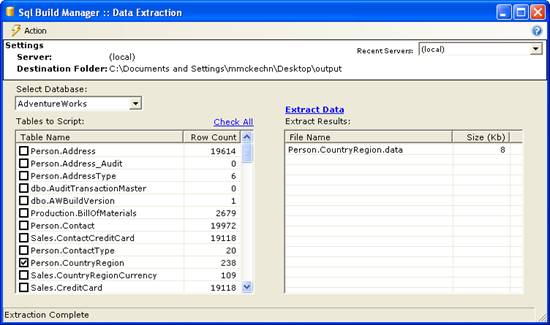
1. Open the Data Extraction form via the Tools –> Data Extraction menu item from the main window
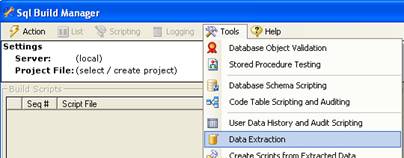
2. On the Data Extract window, you will need to do the following:
a. Select your output directory via the Action –> Change Destination Folder menu .
b. Select your source database with the –>Select Database–> dropdown list. (You can change your server via the Action –>Change SQL Server Connection menu item or the Recent Servers list)
c. Once you select the database, the Tables to Script list will populate with the table list for that database as well as the row count for each table.
d. Next, check the tables you want to extract from and click the –>Extract Data–> link.
e. The files that were created display in the –>Extract Results–> list. If you want to open a file, you can right-click on it and select –>Open File–>.
Data Insertion Script Creation
Once you have extracted data, what are you to do with it? Well, you can always generate scripts to put it back! This is useful create a restore for a table and also to move data easily from one environment to another. In order to get it back into a table, you–>ll need to create the INSERT/UPDATE script combinations for the extracted data.
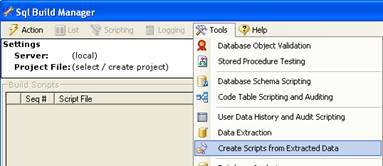
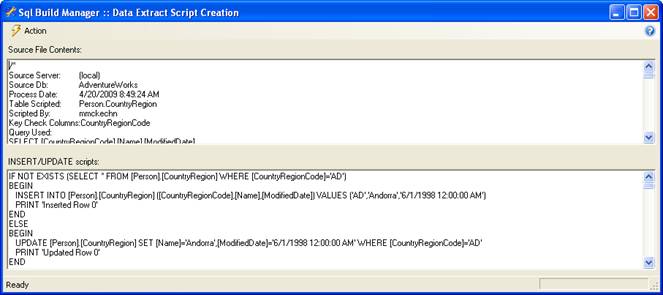
1. Open the Data Extract Script Creation Form via the Tools –> Create Scripts from Extracted Data menu option.
2. Open a data extract file (*.data) via the Action –> Open Data Extract File menu item. Once you select the file, its contents will be loaded into the top text box and the script creation process will be kicked off. The generated scripts are displayed in the bottom text box. These scripts are suitable to be copied and pasted into a Sql Build Manager project file or SQL management studio window for execution.
Database Object Validation
Do you know if your database views, stored procedures and functions are all in sync? Are all of your table references correct? This functionality attempts to scan your database and alert you of potential errors –> before you find them at runtime. The validation consists of the following checks:
-
Execution of**sp_helptext system procedure for the objects: This checks to ensure that there is no discrepancy in the object registration in the database
-
SQL parsing: Runs a SQL server query parse for the object definition. This uses SQL server–>s built-in functionality to run through the definition and check for the validity of referenced–> tables, columns, views, etc
-
Execution of**sp_depends system stored procedure for the objects: Another means for SQL Server to check the validity of table references. NOTE: If there is a cross-database join. SQL server will not necessarily detect the dependency, in which case the validation will return a status alerting you of such.
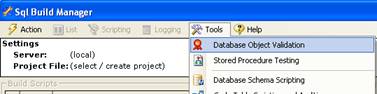
1. Open the Database Object Validation form using the Tools –> Database Object Validation menu item.
2. On the form, select the database you want to check in the database dropdown list. (You can also change your SQL Server connection via the Action –> Change Sql Server Connection menu option or Recent Servers list).
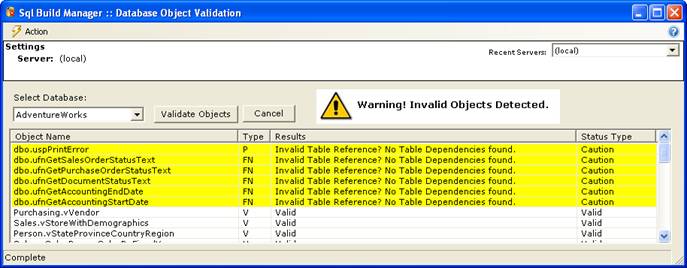
3. The list will populate with the checked Stored Procedures (type –>P–>), Function (type –>FN–>) and Views (type –>V–>). There are 4 status types that you can get in the result:
a. Valid –> self explanatory. The object passes the validation tests
b. Invalid –> again, self explanatory. The object fails one of the validations. You will get a detail of the failure in the Results column.
c. Caution –> a warning. This doesn–>t necessarily mean that the object is invalid, but will let you know what to look for in the Results column.
d. Cross Database Join –> another warning. The tool detected a possible join across databases and lets you now that is could not fully validate the references.
If there are any items that do not return a Valid status, the warning message will display.
Rebuilding Previously Committed Build Packages
One of the useful features of the logging that Sql Build Manager performs is that it allows the tool to also reverse engineer a build package that has been committed to a database (or combination of databases). This allows you to re-create a package with all of the scripts of the original to archive off, or run against another environment.
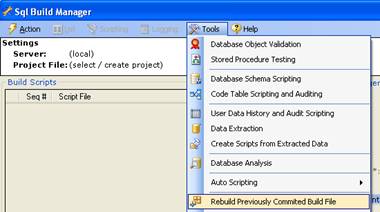
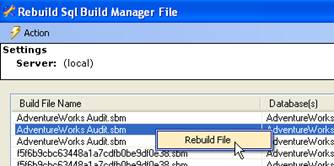
1. Open the Rebuild Sql Build Manager File form with the Tools –> Rebuild Previously Committed Build File menu item
2. When the form opens, it will automatically scan the server you are connected to. It will populate the table with all of the build files that it found, originally sorted in reverse chronological order. Also in the list are the database(s) that the build file was run against, and the number of scripts that were included in the file. You can change the server via the Action –> Changes Sql Server Connection or Recent Servers drop down
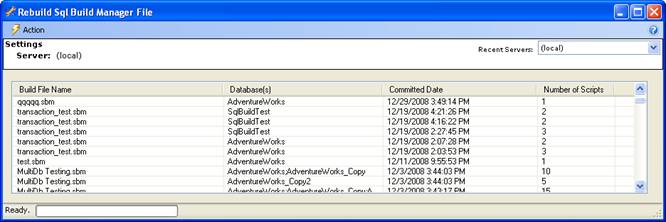
3. Once you pick a build file to reconstruct, select it in the list, then right-click and select Rebuild File context menu item. You will then be prompted where to save the file.
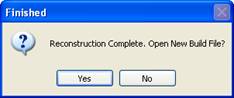
4. After the rebuild is completed, you will be prompted whether or not you want to open this new file. Selecting –>Yes–> will–> you guessed it–> open the file
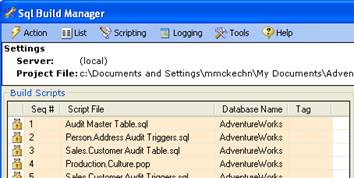
5. Once the file opens, you will notice that all of the scripts are marked as –>Run Once–>. This may or may not have been the original setting. The logging does not record your runtime settings, so it defaults to the –>safest–> setting. You can however, update these settings as needed for you to reuse the package.
Enterprise / Team Settings
This feature in Sql Build Manager allows you to manage certain settings for a team, rather than having an isolated/ per installation settings. This is managed by a settings configuration file that needs to be accessible by all of your users.
Enterprise/Team Settings Configuration File
The team settings are controlled via a common configuration file that each installation can read from. This can be handled via either placing this file in a common file share or making it available via an http URL. If for some reason the file is not readable, the tool will use settings it was last able to retrieve. The configuration file in an XML formatted file conforming to a specific XSD schema (this schema is called EnterpriseConfiguration.xsd and can be found in your installation folder).
appSettings Key/Value Pair
To point your Sql Build Manager installation to the team configuration file, you will need to edit the application configuration file Sql Build Manager.exe.config. In this file add or edit the appSettings section–>s key –>Enterprise.ConfigFileLoation–> and set the value to either a file share location, UNC path, or HTTP URL where you team settings file can be found. Upon restarting the application, it will now use this file for team settings.

Script Change Settings
Table Change Watch
This team setting lets you put –>alerts–> on table changes. It detects ALTER TABLE and DROP TABLE change scripts upon saving from the Edit Script Text window. It then compares these table change scripts against a list of tables that are being –>watched–>. If there is a match, the alert window is displayed. This window gives the following information:
-
Notice that this is a Table Change Watch, what it is and how to send the notification
-
A description of the alert –> should explain what the alert is for
-
A list of tables modified –> list the tables altered in your script that matched an item in the watch list
-
A list of folks that wanted the alert.
To give these folks their notice, you–>ll need to click the –>Send Notification–> button (for each alert box if there is more than one). This will open your default e-mail program with a configured, populated e-mail –> just click –>Send–>.
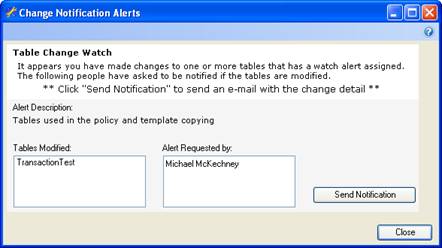
Configuring Table Change Watch
The file can contain one or more <TableWatch> elements and each of these can contain one or more Table and Notify elements. You can use any XML editor to help you create the file, but one that can validate against the schema will be the most helpful.

Script Policy Settings
Script policies are enforced via configuration
so you can turn them on and off as needed. This is handled via
<ScriptPolicy> elements in the EnterpriseConfiguration.xml file. Each
script policy will have its own element and PolicyId value. You can turn
off policy enforcement by either removing the element or setting the
Enforce attribute value to false.
The current list of PolicyId–>s is:
-
CommentHeaderPolicy
-
ConstraintNamePolicy
-
GrantExecutePolicy
-
GrantExecuteToPublicPolicy
-
QualifiedNamesPolicy
-
ReRunablePolicy
-
SelectStarPolicy
-
StoredProcParameterPolicy
-
WithNoLockPolicy
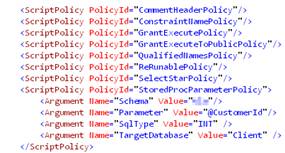
The StoredProcParameterPolicy is additionally configurable with 4 –>Arguments–> that are added via <Argument> sub-elements. The allowed argument names are:
-
Schema –> a stored procedure filter setting. Selects the schema that the stored procedure must belong to in order to –>match–> for the policy check.
-
TargetDatabase –> a stored procedure filter setting. The target database that the stored procedure needs to be targeted toward in order to –>match for the policy check.
-
Parameter –> the name of the stored procedure parameter (with the –>@–>) that you want to make sure is included in the stored procedure signatures.
-
SqlType –> the SQL type of the parameter that you want to make sure is included in the stored procedure signatures.
Feature Access Settings
There is the ability to activate/deactivate features by user. Currently, the only feature that is under control is the access to the Remote Execution Service. The <FeatureAccess> element contains both a FeatureId attribute (currently, only –>RemoteExecution–> is valid) and a Boolean value of Enabled. A sub-element of <Allow> takes a LoginId value that should be set to the userid of the user that has access to the particular feature.
